✨📊 Building a Dynamic Vedic Astrology Chart in Flutter ✨🔬
✨ Introduction ✨
While developing the Astrology application for web and mobile, I faced a unique challenge: creating a dynamic Vedic astrology chart (kundali 🌟) in Flutter 💻. This task seamlessly blended traditional astrological principles ✨ with modern development techniques 🌐. In this guide, I walk you through building a dynamic horoscope chart from scratch—featuring precise planetary placements 🌌 and meticulous geometric calculations 🔬. Along the way, I share key insights on geometric computation 🔢, canvas drawing 🎨, and the vital role of precision in astrological analysis ✨.
✨ The Challenge ✨
Building a Vedic horoscope chart is more than just drawing lines ✏️; it requires precise mathematical representation ⚖️ to:
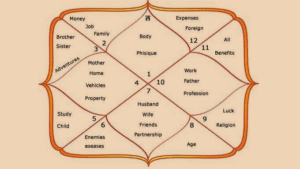
- Accurately depict 12 houses □ in perfect proportion
- Dynamically accommodate varying planetary positions 🌌
- Clearly display Rashi (zodiac) placements ♈♉♊
- Maintain perfect geometric alignment 🔬 of intersecting lines
- Scale seamlessly across different screen sizes 📲
✨ Technical Implementation ✨.
1. Understanding the Geometric Foundation
We begin by deconstructing the chart into fundamental geometric elements such as the outer square, cross-diagonals, and diamond. Key formulas include:
- The key formula for coordinates:
These formulas ensure precise calculation of intersection points and proportions, forming the basis of our astrological visualization.
2. Creating a Custom Painter
The custom painter initializes the rendering process. It sets the drawing properties and calculates the chart’s center and effective size, ensuring that subsequent drawing functions operate on a correctly sized canvas.
Mathematical Insight: The chart size is determined as follows:

0.8 value is just what I’m using here, you can increase or decrease based on your choice,
| class HoroscopePainter extends CustomPainter { final Paint _paint; HoroscopePainter() : _paint = Paint() ..color = Colors.black ..strokeWidth = 1.0 ..style = PaintingStyle.stroke; @override void paint(Canvas canvas, Size size) { final center = Offset(size.width / 2, size.height / 2); final chartSize = math.min(size.width, size.height) * 0.8; drawChart(canvas, center, chartSize); } @override bool shouldRepaint(CustomPainter oldDelegate) => false; } |
3. Drawing the Base Structure
Step 1: Drawing the Outer Square
This code draws the outer square that forms the chart’s boundary. The square is centered using calculated dimensions, ensuring a balanced layout.
The formula for a centered Rectangle

| void drawOuterSquare(Canvas canvas, Offset center, double size) { final square = Rect.fromCenter( center: center, width: size, height: size, ); canvas.drawRect(square, _paint); } |
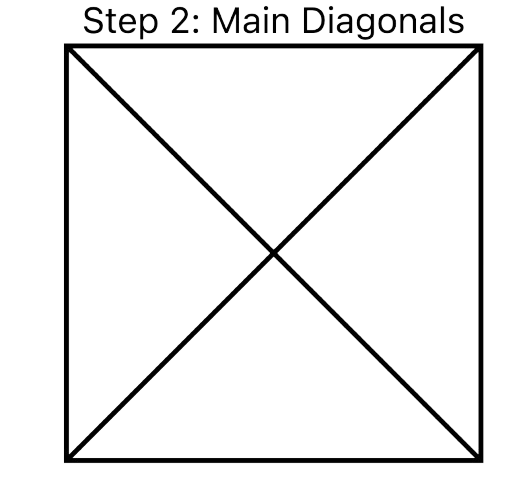
Step 2: Adding the Main Diagonal Lines
The diagonal lines split the outer square into four equal sections, creating a cross. The lines are drawn between opposite corners using the coordinates of the square’s boundaries.
Mathematical Concept:
For any square, the diagonal line is drawn from:
- Top-left to bottom-right:

- Top-right to bottom-left:

| void drawMainDiagonals(Canvas canvas, Offset center, double size) { final square = Rect.fromCenter( center: center, width: size, height: size, ); // Draw diagonal lines canvas.drawLine( Offset(square.left, square.top), Offset(square.right, square.bottom), _paint, ); canvas.drawLine( Offset(square.right, square.top), Offset(square.left, square.bottom), _paint, ); } |
It will be the diagram after that
4. Creating the Diamond Pattern
This step enhances the design by overlaying a diamond shape on the chart. The diamond is created by connecting the midpoints of each side of the square.
Key Calculations:
- Midpoint Formula:

This ensures that the diamond is symmetrically aligned with the square.
| void drawDiamondPattern(Canvas canvas, Offset center, double size) { final square = Rect.fromCenter( center: center, width: size, height: size, ); // Calculate midpoints final midTop = Offset(square.center.dx, square.top); final midRight = Offset(square.right, square.center.dy); final midBottom = Offset(square.center.dx, square.bottom); final midLeft = Offset(square.left, square.center.dy); // Draw diamond lines canvas.drawLine(midTop, midRight, _paint); canvas.drawLine(midRight, midBottom, _paint); canvas.drawLine(midBottom, midLeft, _paint); canvas.drawLine(midLeft, midTop, _paint); } |
It will be the diagram after that

5. Calculating House Positions
This section divides the square into 12 astrological houses using trigonometric functions. Each house’s vertices are computed by rotating around the chart’s center.
| class HousePosition { final Rect bounds; final List<Offset> vertices; HousePosition(this.bounds, this.vertices); } List<HousePosition> calculateHouses(Offset center, double size) { final houses = <HousePosition>[]; final square = Rect.fromCenter( center: center, width: size, height: size, ); // Calculate intersection points using trigonometry for (int i = 0; i < 12; i++) { final angle = i * 30 * math.pi / 180; final vertices = _calculateHouseVertices(square, angle); final bounds = _calculateHouseBounds(vertices); houses.add(HousePosition(bounds, vertices)); } return houses; } List<Offset> _calculateHouseVertices(Rect square, double angle) { // Using the circle formula: x = center_x + r * cos(angle), y = center_y + r * sin(angle) final radius = square.width / 2; final x = radius * math.cos(angle); final y = radius * math.sin(angle); return [ Offset(square.center.dx + x, square.center.dy + y), // … calculate other vertices as needed ]; } |
6. Dynamic Planet Placement
Below is a revised, step-by-step process for assigning planets to houses based on the matching of their zodiac signs (Rashi):
- Determine the House’s Zodiac Sign:
Identify the zodiac sign that corresponds to each house number (this is often called the “bhav rashi”). - Compare the Planet’s Rashi:
For each planet, check the zodiac sign in which it is placed (the planet’s rashi). - Assign the Planet to the House:
If the planet’s rashi matches the bhav rashi of a particular house, assign that planet to that house.
This part computes optimal positions for planets within each house, ensuring no overlaps occur and text remains legible. It adjusts positions dynamically based on the number of planets. These formulas dynamically distribute planets in a chart within each house.
| Offset getPaddedPosition(List<Offset> positions, int index) { if (index < 0 || index >= positions.length) return Offset.zero; Offset basePosition = positions[index]; return Offset(basePosition.dx + index * padding, basePosition.dy); } Map<int, int> occupiedPositions = {}; Offset getNextAvailablePosition(List<Offset> positions, int house) { if (positions.isEmpty) return Offset.zero; int count = occupiedPositions[house] ?? 0; if (count >= positions.length) return Offset.zero; occupiedPositions[house] = count + 1; return getPaddedPosition(positions, count); } |
| class PlanetPlacement { final String planet; final Offset position; final double rotation; PlanetPlacement(this.planet, this.position, this.rotation); } List<PlanetPlacement> calculatePlanetPlacements( HousePosition house, List<String> planets, ) { final placements = <PlanetPlacement>[]; final houseCenter = house.bounds.center; // Calculate optimal positions for multiple planets using a circular distribution final spacing = math.min( house.bounds.width / (planets.length + 1), house.bounds.height / (planets.length + 1), ); for (int i = 0; i < planets.length; i++) { final angle = (i * 2 * math.pi) / planets.length; final radius = spacing / 2; final x = houseCenter.dx + radius * math.cos(angle); final y = houseCenter.dy + radius * math.sin(angle); placements.add(PlanetPlacement( planets[i], Offset(x, y), angle, )); } return placements; } |
It will be the final Horoscope Chart after the implementation

🔬 Important Key
1. ⚖️ Mathematical Precision is Crucial
- Geometric accuracy is essential for a readable chart.
- Key formula:
- Intersection points:

2. ⏳ Optimizing Canvas Performance
- Redraw only when necessary ✨.
- Scale dynamically for different screen sizes 📲.